Creating your own Cup figurine is easier than you might think.With the right tools and a little creativity, you can turn your photo into a collectible item that impresses friends and family.
FIFA Panini Collection
Panini S.p.A.
This complete guide shows you exactly how you can make your Cup figurine from start to finish, using available resources and simple techniques that anyone can master in a few minutes.
Why Create Your Own Cup Figurine
Cup figurines have always been symbols of passion for football and moments of fun with friends. When you create your own figurine, you turn a hobby into something personal and unique that reflects your identity. This is especially valuable because you can honor loved ones, create memories of special moments or simply take advantage of the trend of cups to do something creative and memorable.
Personalization allows you to get out of the ordinary and show your creativity. While others collect traditional figurines, you will be creating unique pieces that no one else will have. In addition, sharing your personalized figurines on social networks can generate interesting engagement and consolidate you as someone creative in your community.
Preparing To Create Your Cup Figurine
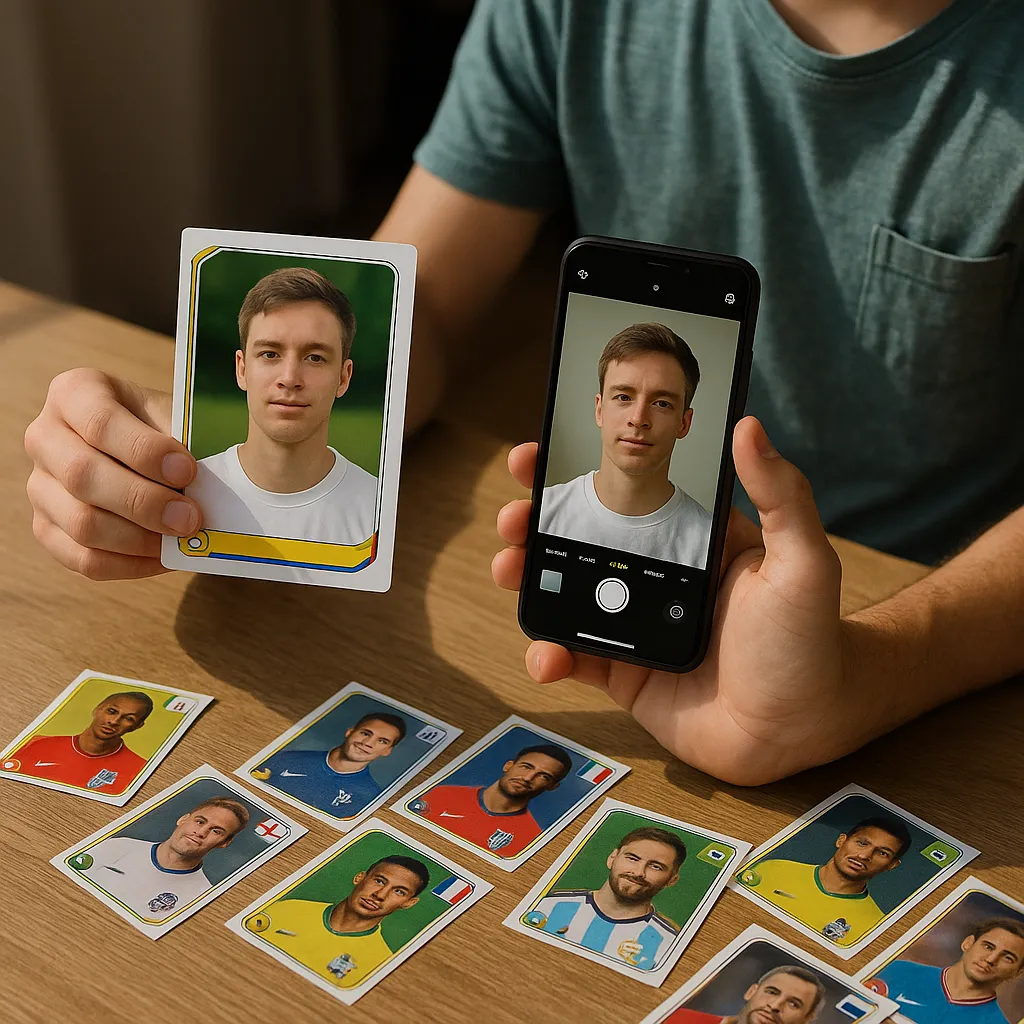
Before you start making your Cup figurine, you need to have some materials and information at hand. Choose a high quality photo that is the basis of your figurine, because clear and well-lit images produce much better results. The photo should have good resolution, preferably taken in good lighting and without shadows that impair the visualization of the face or the element you want to highlight.
You should also decide what style your sticker will have: realistic, caricature, artistic drawing or cartoon style. This choice influences which tool you will use and how you will process the image. Also consider the desired final size, as printed stickers must have at least 300 DPI resolution for acceptable quality in physical printing.
Essential Tools to Make Your Cup Figurine
There are several platforms and applications that make it easy to create your Cup sticker without the need for advanced design knowledge. Free applications such as Canva, PicsArt and Photopea offer specific templates for stickers and stickers that you customize with your photos. These applications work both on your computer and on your mobile phone, offering flexibility to create your sticker whenever you have time available.
If you prefer something simpler, online platforms like Pixlr or Photoshop Express allow quick edits without installation. For those who want more professional results, Photoshop or GIMP (free) offer full control over the editing. The choice depends on your level of experience and the time you are willing to invest in creating your figurine.
Complete Checklist to Create Your Cup Figurine
To ensure that you do not forget any important step when making your Cup figurine, use this practical checklist that covers from preparation to completion of the project. Each item represents a crucial step that contributes to the success and final quality of your creation.
Preparation and Selection Phase
The first step of your checklist is to select the correct image and prepare the workspace. You should check if you have a high-resolution photo with good contrast, have your computer or mobile phone loaded and with available disk space, set the style you want (realistic, cartoon or caricature), choose the editing platform you will use, and ensure you have access to the internet to use online tools. Take a few minutes to back up the original photo before starting any editing, so you can always start over if necessary.
You should also set the ideal dimensions for your figurine before you start. Standard figurines are usually square or slightly rectangular, with an approximate size of 5x5 centimeters when printed. If you want to use the figurine digitally (on social networks or applications), dimensions of 512x512 pixels are suitable, while for printing you need 1500x1500 pixels at a minimum resolution of 300 DPI.
Editing and Customization Phase
During editing, you should open the chosen app or platform and import your main photo. The next item in the checklist is to crop the image to focus on the main element (face, full body or specific detail). After cropping, you should apply filters that complement your desired style, adjust brightness and contrast to enhance the visualization, and add special effects if desired (such as decorative borders or shadows).
You need to check the quality of the edit in different sizes before proceeding. Enlarge the image in your editing program to identify blurred pixels or areas with poor quality that need correction. Apply sharpening or smoothing tools as needed, remove noise that impairs visual quality, and confirm that the colors are vibrant and attractive. This step avoids unpleasant surprises when the sticker is printed or shared in high resolution.
Design Phase and Additional Elements
Now you add elements that make your figurine unique and identifiable as a Cup figurine. Include a sequential serial number (as does the official figurine), add the name of the Cup of the year or edition, enter your name or nickname as creator, and consider adding a motivating phrase or symbol related to football. These elements make the figurine more complete and professional, as well as create a sense of collection if you plan to make several custom figurines.
You should choose colors that work well with the main image and ensure that all text is legible when the sticker is reduced in size. Use light, not too thin fonts, position text in areas that do not visually compete with the main image, and consider adding a white outline around the text to improve readability. If you are creating a series of stickers, maintain visual consistency in fonts, colors, and style of decorative elements.
Review and Finalization Phase
Before considering your complete sticker, you should do a thorough review that includes spelling check on all texts, confirmation that colors appear correctly on the screen, final dimensions check in relation to your goal (digital or printed), and visual test of the small card in reduced size simulating how it will appear when shared. Close all other applications to ensure that the editing program works properly and make a test export before the final version.
You should also back up the file in different formats: save in PNG with transparency for maximum quality, in JPEG for sharing on social networks, and keep the original project file (PSD, XCF or similar) if you need to make further adjustments. Create a specific folder on your computer to store all versions and maintain organization. After exporting, inspect the final file one last time in a viewer other than the editing program to ensure that it is exactly as you want.
Detailed Step by Step to Make Your Cup Figurine
Now you will learn exactly how to perform each stage of creating your Cup sticker with practical and easy-to-follow instructions. This process works regardless of which tool you choose, as the principles of editing and design are universal.
The first step is to open your editing application and create a new project with appropriate dimensions. If you are using Canva, click "Create a Design" and select "Sticker" or "Figure" if available. If no specific option exists, choose square dimensions such as 1080x1080 pixels. Make sure the background is blank or transparent, as this makes it easier to print and share finger.
Then you import your photo into the project. Most applications allow you to drag and drop directly or click on an "Import" button After importing, the image will probably occupy the entire work screen. You need to resize it and position it correctly: reduce its size to occupy between 60 to 80% of the total area, visually centering it and leaving room for additional elements such as text and decorations.
Now you get the customization. If your app offers preset filters (cartoon, sketch, vintage), apply the one that most closely matches your desired style.You can then adjust brightness and contrast manually to ensure that the image stands out. Increase contrast slightly to make the sticker more vibrant, and decrease the brightness a little if the image is too clear, maintaining visual balance.
Then you add design elements that identify the sticker as a Cup sticker. Enter a small sequential number, usually in the lower right or left corner. Place the year or Cup edition in another corner, maintaining consistent size. Add your name as creator in a discreet place, such as the base or secondary corners, to identify the origin of the creation.
You can then add decorative elements that refer to football: small footballs, the colors of the selection, a motivating phrase or symbol related to the theme. These elements should not dominate the composition, functioning as details that value without overloading. Use one or two main colors that complement the photo to maintain visual coherence.
After adding all the elements, you do the final review by looking at the small size sticker. Zoom out in your app to see how it will look when shared in small size on social networks. Make sure all the elements are clearly visible and the design works in reduced dimensions. If something becomes unreadable or confusing in small size, redo that element by increasing its size or improving contrast.
Finally, you export the final sticker in the appropriate format. For physical printing, export in PNG with a minimum resolution of 300 DPI. For digital sharing, JPEG with high quality is enough. Some applications offer the option to export with transparent background, which is ideal if you plan to use the sticker in other projects or print on specific paper for stickers.
Printing Options For Your Cup Figurine
Once you have finished your digital figurine, you may want to turn it into a collectible physical item.There are several printing options that vary in quality, cost and practicality, allowing you to choose the one that best suits your goals.
The simplest and most economical way is to print at home using your own printer. You need to purchase good quality photo paper or special paper for stickers, both available in office supply stores for affordable prices. Print your figurine to desired size, let it dry completely and, if it is adhesive, stick to clean surfaces. This option works well to create some custom figurines quickly, but does not offer professional finishing.
For a more professional result, you can use online services of printing stickers and figurines. Platforms such as Sticker Mule, Vistaprint and the like allow you to upload your figurine and choose quantity, size and type of material. They offer top quality paper, printing in bright colors and finishes as perfect cut and laminated protection. You receive a lot of ready-to-use or collect figurines, with slightly higher cost than home printing but infinitely better result.
Another option is to look for local printers in your city that offer service of printing stickers and stickers. You take your digital file, discuss size and quantity desired, and the graphic prints with your professional machines. This usually offers competitive cost and result of excellent quality, in addition to allowing direct conversations with the professional about printing details.
Advanced Tips to Elevate Your Cup Figurine
If you want your Cup figurine to stand out and impress even more, there are advanced techniques that significantly elevate the visual quality of the final result. These tips require little additional experience, but make a noticeable difference in the professional look of the creation.
First advanced tip is to add shadow or subtle outline around the main figure. This creates visual depth and highlights the white background figurine.In most programs, you select the main image and add a soft shadow with reduced transparency. Avoid very pronounced shadows, which make the result heavy, while maintaining subtlety that only the most attentive eyes will notice.
Second tip is to use gradient or light pattern on the background instead of pure white. A very smooth gradient of one color to white, or a discrete repeating pattern in low opacity, creates visual interest without competing with the main image. For example, a very translucent football pattern on the background refers to the theme without looking exaggerated.
Third advanced tip is to apply a very subtle golden or silver gloss effect around the sticker, simulating metallization. This effect works especially well if your sticker will be printed on special paper. The gloss is done by adding a layer with low opacity (10 to 20%) of a chosen metallic color, creating an elegant halo.
Fourth tip is to create a version of your figurine in square proportion and another in slightly rectangular proportion, testing which one sees best in practice. Different formats can work best for different types of sharing or presentation, so having both versions offers flexibility.
Sharing Your Cup Figurine on Social Networks
Once you have created your Cup sticker, sharing it on social media is an excellent way to gain visibility and receive feedback from friends and followers.Each social network has specific characteristics that influence how you should present your creation for maximum impact and engagement.
On Instagram, you can post the sticker as a photo in the feed, use the stories function (stories) to show the creation process, or even create a carousel showing before and after. Instagram works well with square images, so your sticker in dimension 1080x1080 pixels is perfect. Use hashtags related to Cup, creativity and stickers to increase reach, and consider mentioning friends who appear in your custom stickers.
In TikTok and YouTube Shorts, you can create a short video showing the process of creating your sticker in accelerated motion, starting with the original photo and ending with the final result. These videos usually receive more engagement than static photos, as they show creativity in action. Use dynamic music related to football or Cup to improve the experience.
On Facebook and themed groups about figurine collecting, share your creation describing the process and inviting constructive comments. These spaces have active communities of collectors who appreciate creativity and innovation. Respond to comments and ask questions about how you made the figurine builds community around you and positions you as someone creative and accessible.
Twitter and X let you quickly share images and start conversations. A humorous post about your custom sticker can go viral among football fans. Consider starting a trend by asking others to share their own created stickers, turning into a collective movement on the platform.
Solving Common Problems When Creating Your Cup Figure
During the process of creating your Cup sticker, you may encounter technical or design challenges that seem complicated at first glance.Knowing solutions to these common problems allows you to continue progressing without frustration.
If your image becomes blurry after editing, the problem is usually insufficient resolution or use filters that blur unnecessarily. Solution: use high-resolution photos from the beginning, apply filters sparingly, and use sharpening tools (sharpening) to compensate. Do not enlarge small images to large sizes, as this worsens the quality naturally.
If colors appear different on the computer versus in print, this is a color calibration problem. Solution: export in sRGB instead of other color profiles, which is the universal standard for web and print. If you print locally, adjust the printer color settings or refer to the calibration manual.
If the sticker is visually polluted with many elements, it's time to simplify. Solution: remove elements that do not add value, keep only the essential information (number, year, name). A clean sticker is always more professional than a lot of details that compete for the visual space.
If you have difficulty with the chosen tool, consider switching to a more intuitive one. Solution: test multiple platforms before committing to one, as each person learns better with different interfaces. The time invested in finding the right tool saves hours of frustration.
FAQ: Frequent Questions About Creating Your Cup Costume
What is the ideal size to print a figurine? The standard size of a collectible figurine is approximately 5x5 centimeters, which corresponds to 600x600 pixels in 300 DPI resolution. You can make larger or smaller as per preference, but this size is considered standard in the market.
Can I use any photo to create my figurine? Technically yes, but photos with good lighting, no blurred movement and high resolution produce better results. Avoid photos that are too dark, too light or too shadowy, as these hinder the editing process and affect final quality.
How long does it take to create a sticker? Time varies greatly, but usually between 15 to 45 minutes for someone new, reducing to 5 to 10 minutes as you take experience and master the tool. The time depends on the complexity of the desired design and how many adjustments you make during the process.
Do I need paid software to create quality stickers? No, absolutely. Free tools like Canva, Pixlr and GIMP produce professional results when used correctly. Paid software offers more advanced features, but it is not necessary to create beautiful stickers.
Can I sell the figurines I create? It depends on whether you use photos of yourself or others. Figurines with your photos you can sell freely. If you use photos of other people (friends, celebrities), you need their permission. Figurines based on Copa licenses must follow intellectual property regulations.
What format should I use to share on social networks, PNG or JPEG? For social networks, JPEG offers better compatibility and smaller file size. Use PNG only if you want transparent background.For permanent file on your computer, keep both formats for maximum flexibility.
How do I make my sticker cartoon-style? Use an app that offers cartoon or sketch effect filter, such as PicsArt or Photofunny. Alternatively, some specific apps like Cartoon Photo turn any image into a stylized drawing. Explore different filters to find the cartoon style you like best.
Conclusion: Turn Your Creativity into Memorable Figurines
Creating your Cup figurine is a creative, accessible and fun activity that you can do at any time with simple resources available. You learned in this guide all the necessary steps, from the selection of the initial photo to the final print, also understanding how to customize your creation so that it is unique and memorable.
Remember that the quality of the final sticker depends mainly on two factors: quality of the source photo (use high resolution and good lighting) and care during editing (do not underestimate the importance of small color adjustments and positioning). Use the checklist provided to ensure that you do not miss any important steps and that each element receives appropriate attention.
The most important thing is to start now. Choose a photo you like, open your favorite editing application and make your first figurine.It does not have to be perfect on the first try, because the creation process is as valuable as the final result. Share your creations, receive feedback and keep improving. Your friends will surely love to receive personalized figurines that you created with their own hands, turning a World Cup into a unique and personal memory that everyone will remember for a long time.